How to Mirror / Clone Steam Deck microSD to New SD Card
A guide on migrating a whole partition or drive in SteamOS or Linux in general.
Table of contents:
- I bought a larger SD card for my Steam Deck - how to transfer everything without breaking apps / games?
- How to clone a whole drive in linux using the dd utility (e.g. for creating a perfect clone of your microSD on Steam Deck)
- Guide (start here): Clone your Steam Deck microSD in 3 easy steps!
I bought a larger SD card for my Steam Deck - how to transfer everything without breaking apps / games? #
You already installed a bunch of games to your microSD on Steam Deck, maybe EmuDeck or other emulation setup and a bunch of ROMs and perhaps games from itch.io, using the Heroic launcher and a whole bunch of other stuff to your 256 GB SD card.
But then you realise that SD cards are cheap. You buy a 512 GB A2 microSD or even a 1TB card. By the way, in case you’re still looking for the right card to buy: here’s my personal recommendation - The ideal Steam Deck SD Card for the fastest load times.
How can you move / migrate your data from the old SD card to the new one?
Option 1: Using the Dolphin GUI file manager #
You can just copy and paste your respective folders using Dolphin (the Explorer equivalent of SteamOS) and that will work unless you have some weird setup - but that is painfully slow if your microSD is loaded with lots of data… which is likely if you’re migrating to a larger disk.
Option 2: Using rsync #
I like command-line utilities and don’t quite trust GUI file managers for large data migrations. One kind reddit user suggested using rsync and provided a mini guide. I have found it to be too slow as well, in a quick test. If your disk is quite full or you have a lot of tiny files (likely!), use the guide below.
Option 3: this guide, using dd to clone #
This will max out the write speed of your microSD drive and provide the fastest result. It involves using the Terminal, but hey, you’re here to learn, right? This will teach you useful Linux-fu.
Tip by the Author: By the way, I'm making an action-roguelite top-down shooter for Steam Deck!

I made this, thanks for checking it out:
How to clone a whole drive in linux using the dd utility (e.g. for creating a perfect clone of your microSD on Steam Deck) #
What you will need
- Steam Deck
- old microSD card
- new microSD card (equal in capacity, or larger)
- USB-C microSD card reader (or a USB-A card reader and a USB-C adapter)
- alternatively: a USB-C dock featuring a SD Card Reader (that’s what I used)
Handy to have, not required
- external Keyboard
- external Mouse
Duration
It took me about 45 minutes to clone a 256 GB microSD to a new 512 GB drive I bought at a sale, then a few minutes for extra setup.
Guide (start here): Clone your Steam Deck microSD in 3 easy steps! #
Step 1: Figure out the names of your devices (drives) in Konsole #
Using the Start Menu, launch Konsole (Terminal Emulator).
Note: if you have not yet set your sudo password, now is the time to set that up. Simply enter the command
passwdand hit return. Then configure your password of choice, this will be your superuser/root password for the future, we’ll need it in a sec.
Now we need to determine which drive is which.
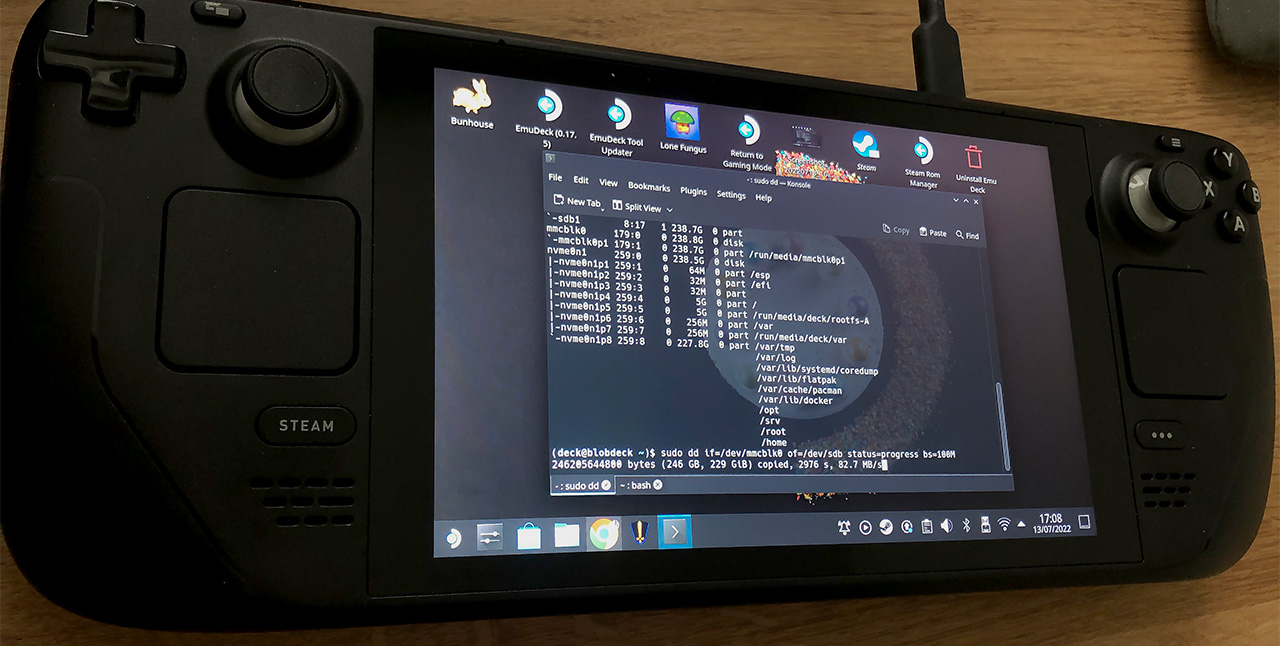
Run the lsblk command to get an overview of your drives and partitions. Take note of the name based on the size of the device, that should help you identify it.
Example:
- my OLD microSD is called /mmcblk0 (in SD Slot)
- my NEW microSD is called /sdb (in card reader dock)
Step 2: Run the “dd” utility for a perfect 1:1 clone #
Now we can start cloning.
Enter the following command in Konsole:
sudo dd if=/dev/$OLDCARDNAME of=/dev/$NEWCARDNAME status=progress bs=100M
$OLDCARDNAME and $NEWCARDNAME (no dollar sign!) with the respective names of the old and new cards. The order matters.What this does: This will clone the drive (and all partitions) specified in if to the drive specified in of, while displaying progress (nice!) and the bs=100M setting will help speed up the process to your microSD’s max write speed by adjusting the block size.
It might take a while, up to a couple hours if you’re cloning a large drive.
When the process is complete, continue to the next step.

Step 3: Reboot and resize partition to fill drive #
If you are migrating to a larger drive, we need to reboot for the linux kernel to report the correct size for the drive and free space available, so that we can resize the partition to the full extent of the drive. Otherwise it will retain the size of the old drive we cloned. Not useful!
Usually Linux doesn’t need a lot of reboots, but this is one of the cases where you need to restart.
- Simply reboot from the power menu of SteamOS Desktop mode.
- After reboooting, the Steam Deck will return to Game Mode. Go back to Desktop Mode.
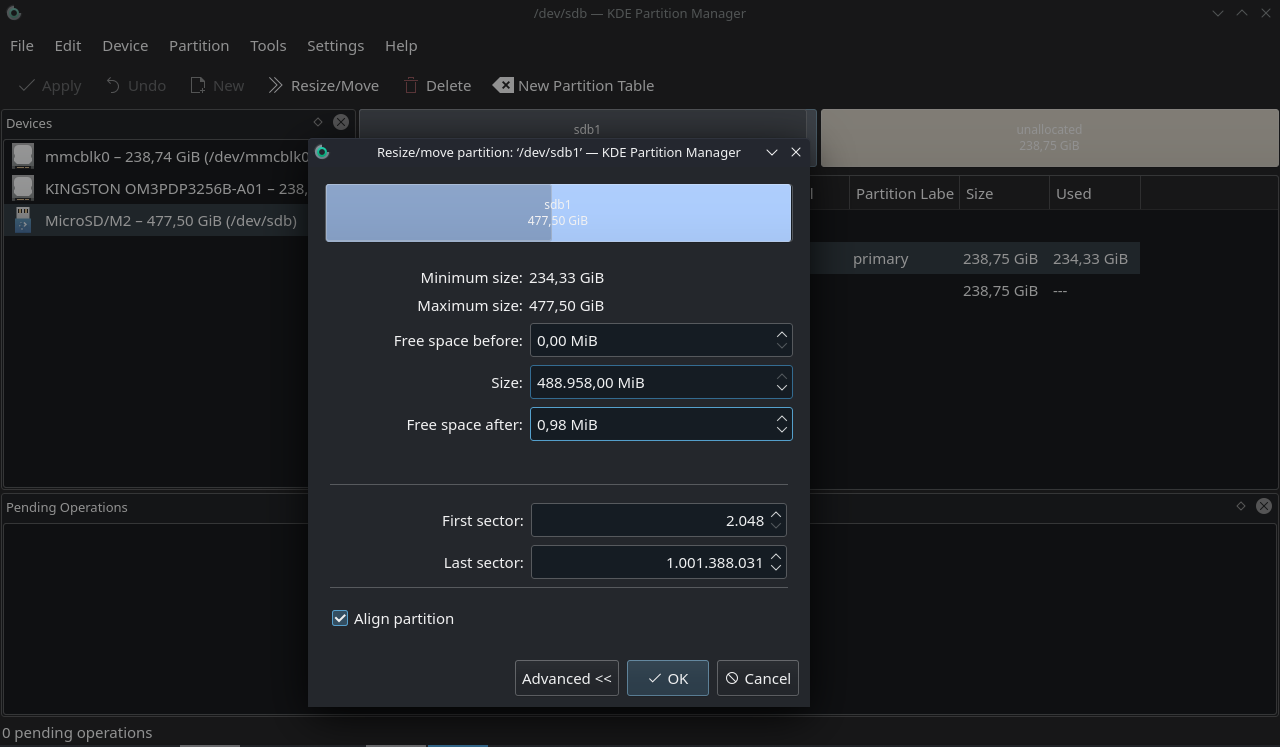
- Open
KDE Partition Managerfrom the Start menu. - Identify your new microSD drive and select the partition we cloned onto it. Click “Resize/Move” and drag the right border of the rectangle to fill up the empty space to the right. Alternatively you can set “Free space after” to zero. Click “OK”. (if Partition Manager complains about having the drive mounted, unmount the drive using the command
sudo umount /dev/$NEWCARDNAME) - Click “Apply” at the top left. This process should be fairly quick.
- Now you can safely eject both microSD cards and insert your new, freshly cloned drive in the microSD slot of your Steam Deck.
- Congratulations, enjoy your perfect clone! All of your applications and games, including emulation should work right out of the box.
Troubleshooting #
Q: I rebooted but I still can’t resize my new drive’s partition to fill up the empty space, what’s happening?
A: You could try unmounting the drive using
sudo umount /dev/$NEWCARDNAME
(remember: we can figure out the name of the drive using lsblk) and running
sudo resize2fs /dev/$NEWCARDNAME
to try and expand the partition via the Terminal. It might come back with additional instructions, in which case follow those and run it again.